Learn how to deploy Supabase on AWS with our step-by-step guide. It walks you through launching the Meetrix Supabase AMI with CloudFormation, choosing an instance type and volume size, pointing your domain at the server, signing in to Studio, finding your API keys, and setting up the daily database backup to S3 that protects your data once the project is live.
Supabase is the open-source backend built on Postgres: a database, Auth, instant REST APIs, Realtime, Storage and Edge Functions in one project, managed from the Studio dashboard. Self-hosting it in your own AWS account keeps your data on infrastructure you control, and the only limits on database size or API requests are the instance and volume you pick. If you are still weighing it up, our comparison of Supabase vs Firebase covers what you gain and what you give up. The Meetrix image runs Supabase on Ubuntu 26.04 LTS with Postgres 17, and generates a fresh JWT secret, API keys and database password on first boot.
Video Guide
Prerequisites
Before you get started with the Supabase AMI, ensure you have the following prerequisites:
- Basic knowledge of AWS services, including EC2 instances and CloudFormation.
- An active AWS account with permission to create EC2, VPC, IAM and CloudFormation resources.
- An EC2 key pair in the region you will deploy to.
- A domain name, ideally with its hosted zone in Route 53 in the same AWS account, so SSL is issued automatically. Without one, Supabase runs on its Elastic IP over HTTP.
- An existing S3 bucket in the same region for the daily database backups. It is optional, but anything beyond a test deployment should have one.
- If you encounter a vCPU quota error when launching the stack, follow https://meetrix.io/blogs/increase-aws-vcpu-quota/ to increase your vCPU limit.
Launching the AMI
Step 1: Find and Select Supabase AMI
- Log in to your AWS Management Console.
- Navigate to 'Supabase' in AWS Marketplace.
Step 2: Initial Setup & Configuration
- Click the "Continue to Subscribe" button.
- After subscribing, accept the terms and click "Accept Terms".
- Wait a few minutes until processing completes, then click "Continue to Configuration".
- Select "CloudFormation script to deploy Supabase" as the fulfillment option and choose your region. Click "Continue to Launch".
- From the "Choose Action" dropdown, select "Launch CloudFormation" and click "Launch".
Create CloudFormation Stack
Step 1: Create a stack
- Ensure the "Template is ready" option is selected under "Prepare template".
- Click "Next".
Step 2: Specify stack options
- Provide a unique "Stack name".
- Enter the "AdminEmail". It is used for the Let's Encrypt SSL certificate and as the Auth admin email.
- Enter a value for "DeploymentName", such as
prod. It becomes part of the IAM role and export names, so give each Supabase stack in your AWS account a different one, even in different regions. - Provide a public domain for "DomainName", such as
api.yourdomain.com. If the domain's hosted zone is in Route 53 in this account, SSL is set up automatically while the stack is created. Leave the defaultsupabase.example.comto run Supabase on its Elastic IP over HTTP. - Choose an instance type "InstanceType" (Recommended: t3a.medium, the default). Supabase needs at least 4 GiB of RAM.
- Select your preferred "KeyName".
- Enter the name of your S3 bucket for "S3Bucket" to turn on daily database backups. Leave the default
yours3bucketto skip them for now. - Set "SSHLocation" to your own IP as
x.x.x.x/32, or0.0.0.0/0to allow SSH from anywhere. - Enter the "SupabaseDashboardUsername" and "SupabaseDashboardPassword" you will use to sign in to Studio. The password takes 8-64 characters: letters, numbers and
_ . - @ ! % * + =only. - Set "VolumeSize", the root EBS volume in GiB (see the note below).
- Keep "SubnetCidrBlock" as 10.0.0.0/24.
- Keep "VpcCidrBlock" as 10.0.0.0/16.
- Click "Next".
Choosing VolumeSize
VolumeSize sets the size of the root gp3 EBS volume, anywhere from 20 to 16,384 GiB, with 30 GiB as the default. Everything Supabase stores lives on it: the Postgres database, files uploaded to Storage, and the Docker images the stack runs from. 30 GiB is plenty to build and test with. For production, size it for your expected database plus uploads, with headroom. You can increase the volume later, but an EBS volume cannot be made smaller.
Step 3: Configure stack options
- Choose "Roll back all stack resources" and "Delete all newly created resources" under "Stack failure options".
- Click "Next".
Step 4: Review
Review and verify the parameters you've entered.
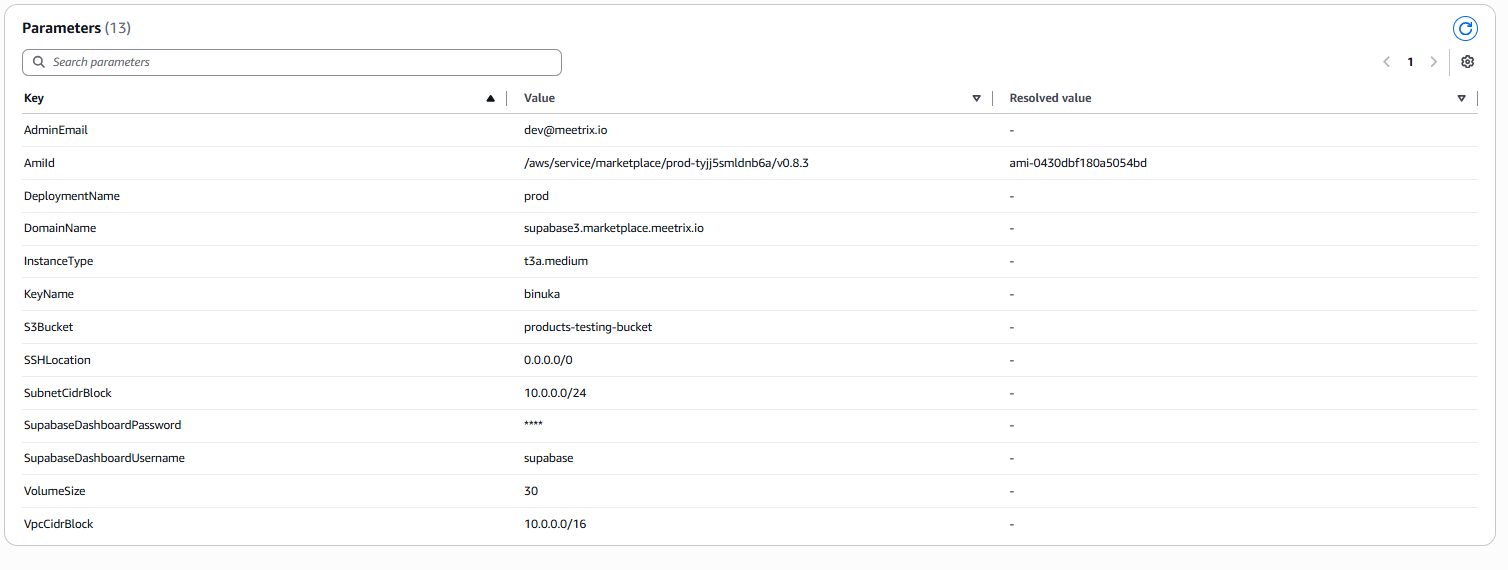
- Tick "I acknowledge that AWS CloudFormation might create IAM resources with custom names".
- Click "Submit".

Afterward, you'll be directed to the CloudFormation stacks page. The stack stays in CREATE_IN_PROGRESS until first boot finishes: the instance generates its secrets, initializes Postgres, starts every Supabase service and requests the SSL certificate, then reports back to CloudFormation. This takes about 5-10 minutes. Once the status shows CREATE_COMPLETE, Supabase is already running.

Update DNS
Step 1: Copy IP Address
Copy the public IP labeled "PublicIp" in the "Outputs" tab. It is an Elastic IP, so it stays the same when the instance stops and starts.
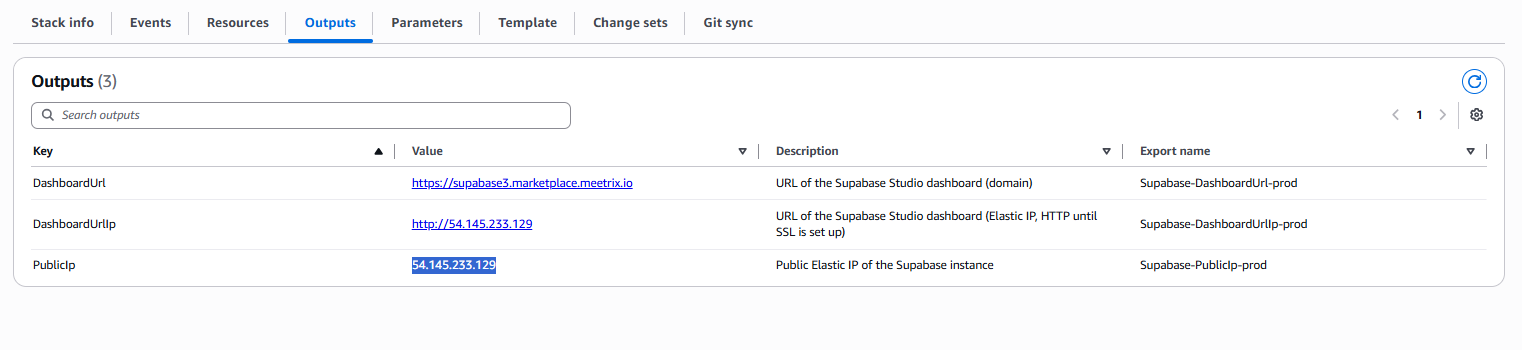
Step 2: Update DNS
- Go to AWS Route 53 and navigate to "Hosted Zones".
- Click Create record.
- Add a record name matching the DomainName you entered, keep the record type as A, and paste the copied PublicIp into the value textbox.
- Click "Create records".
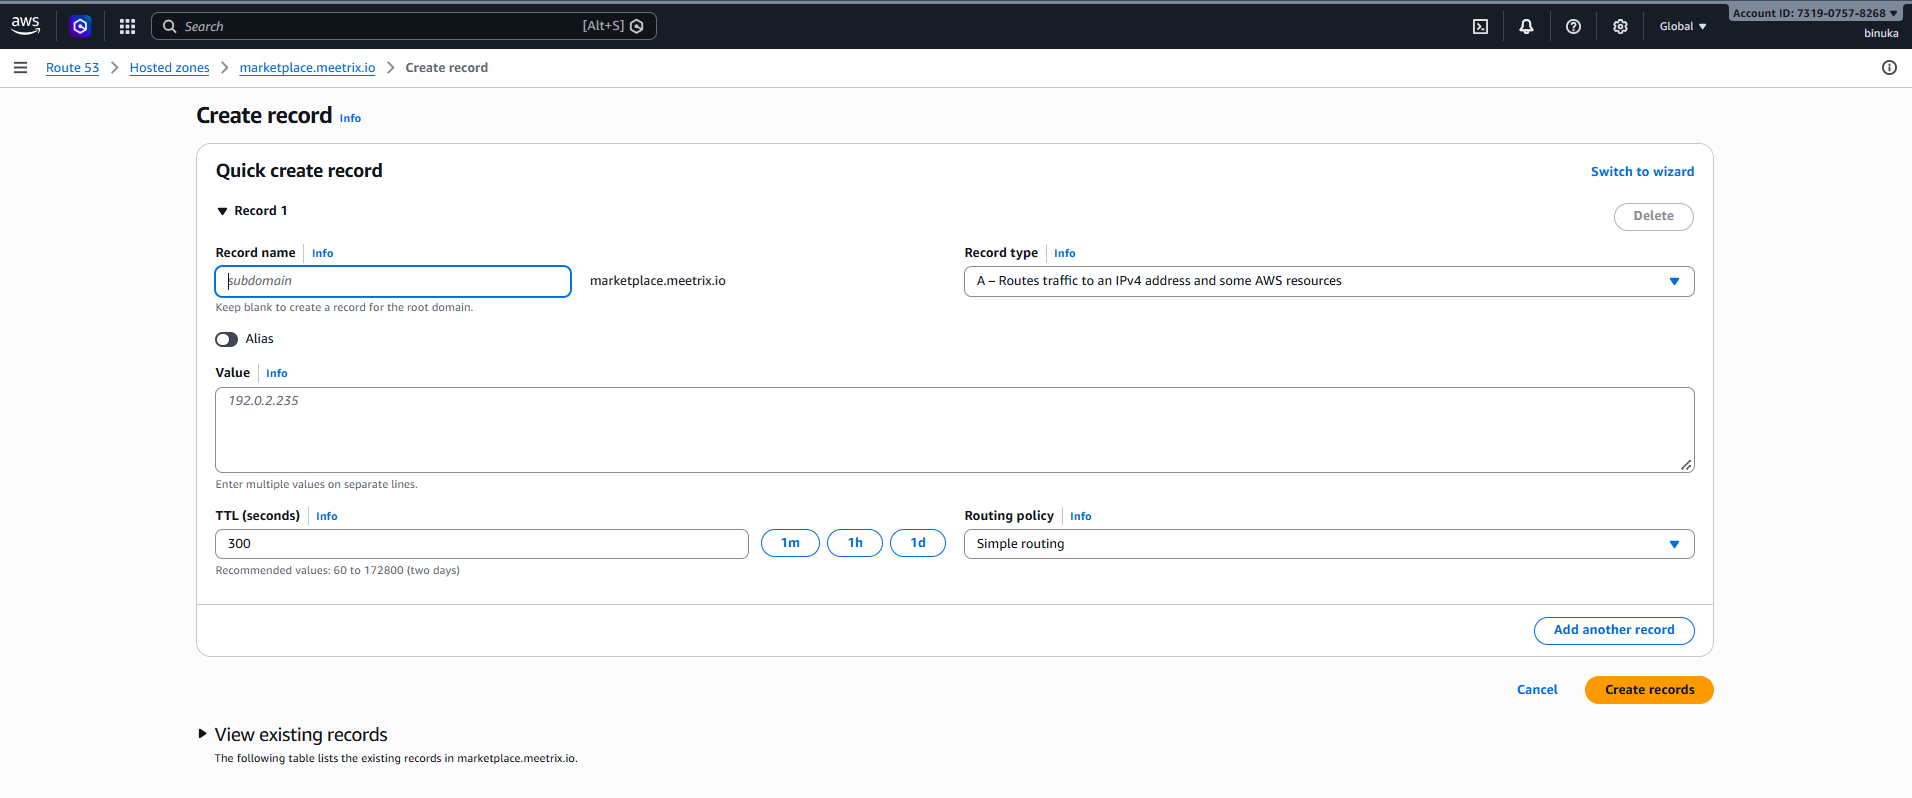
If your domain is managed by another DNS provider, create the same A record there, then follow Generate SSL Manually below.
Access Supabase
Open the "DashboardUrl" from the Outputs tab. Until DNS and SSL are in place you can use "DashboardUrlIp" instead, which opens Studio on the Elastic IP over plain HTTP.
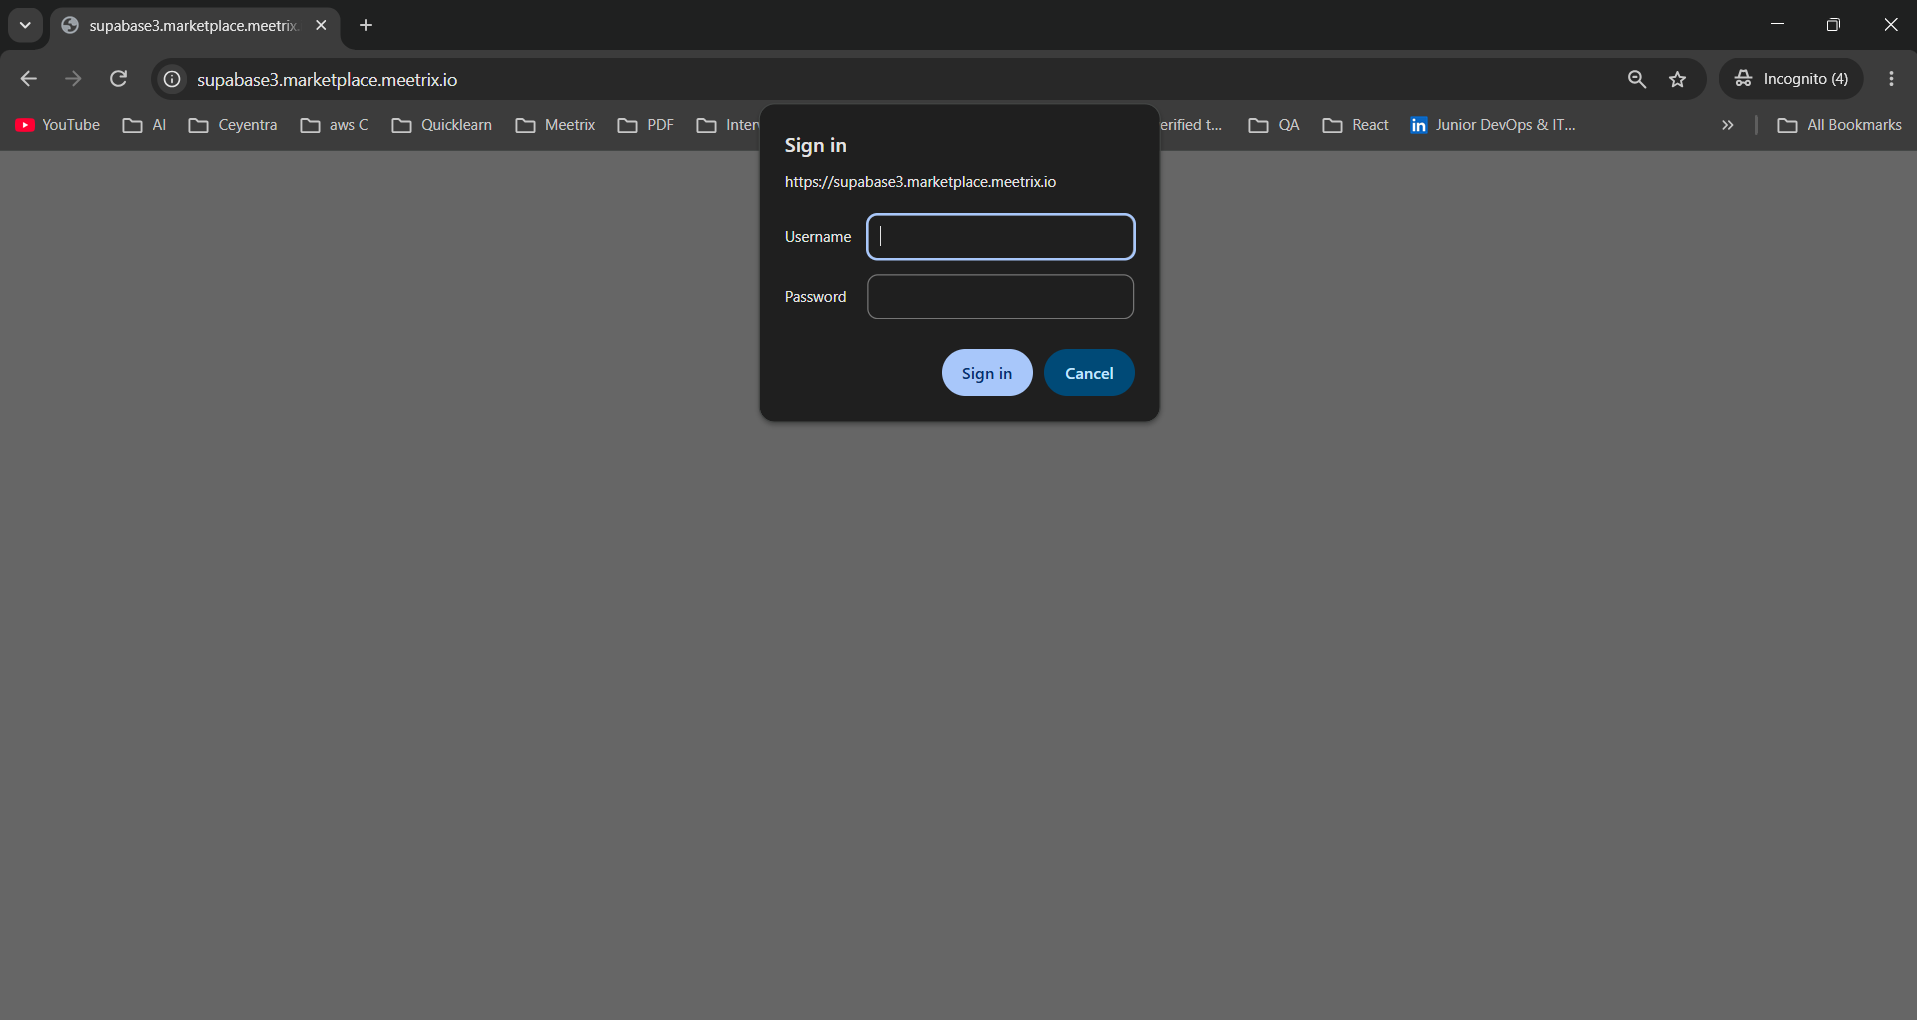
Studio sits behind HTTP basic auth, so your browser asks for a username and password first. Enter the SupabaseDashboardUsername and SupabaseDashboardPassword you set in the stack parameters, then click "Sign in".
Note
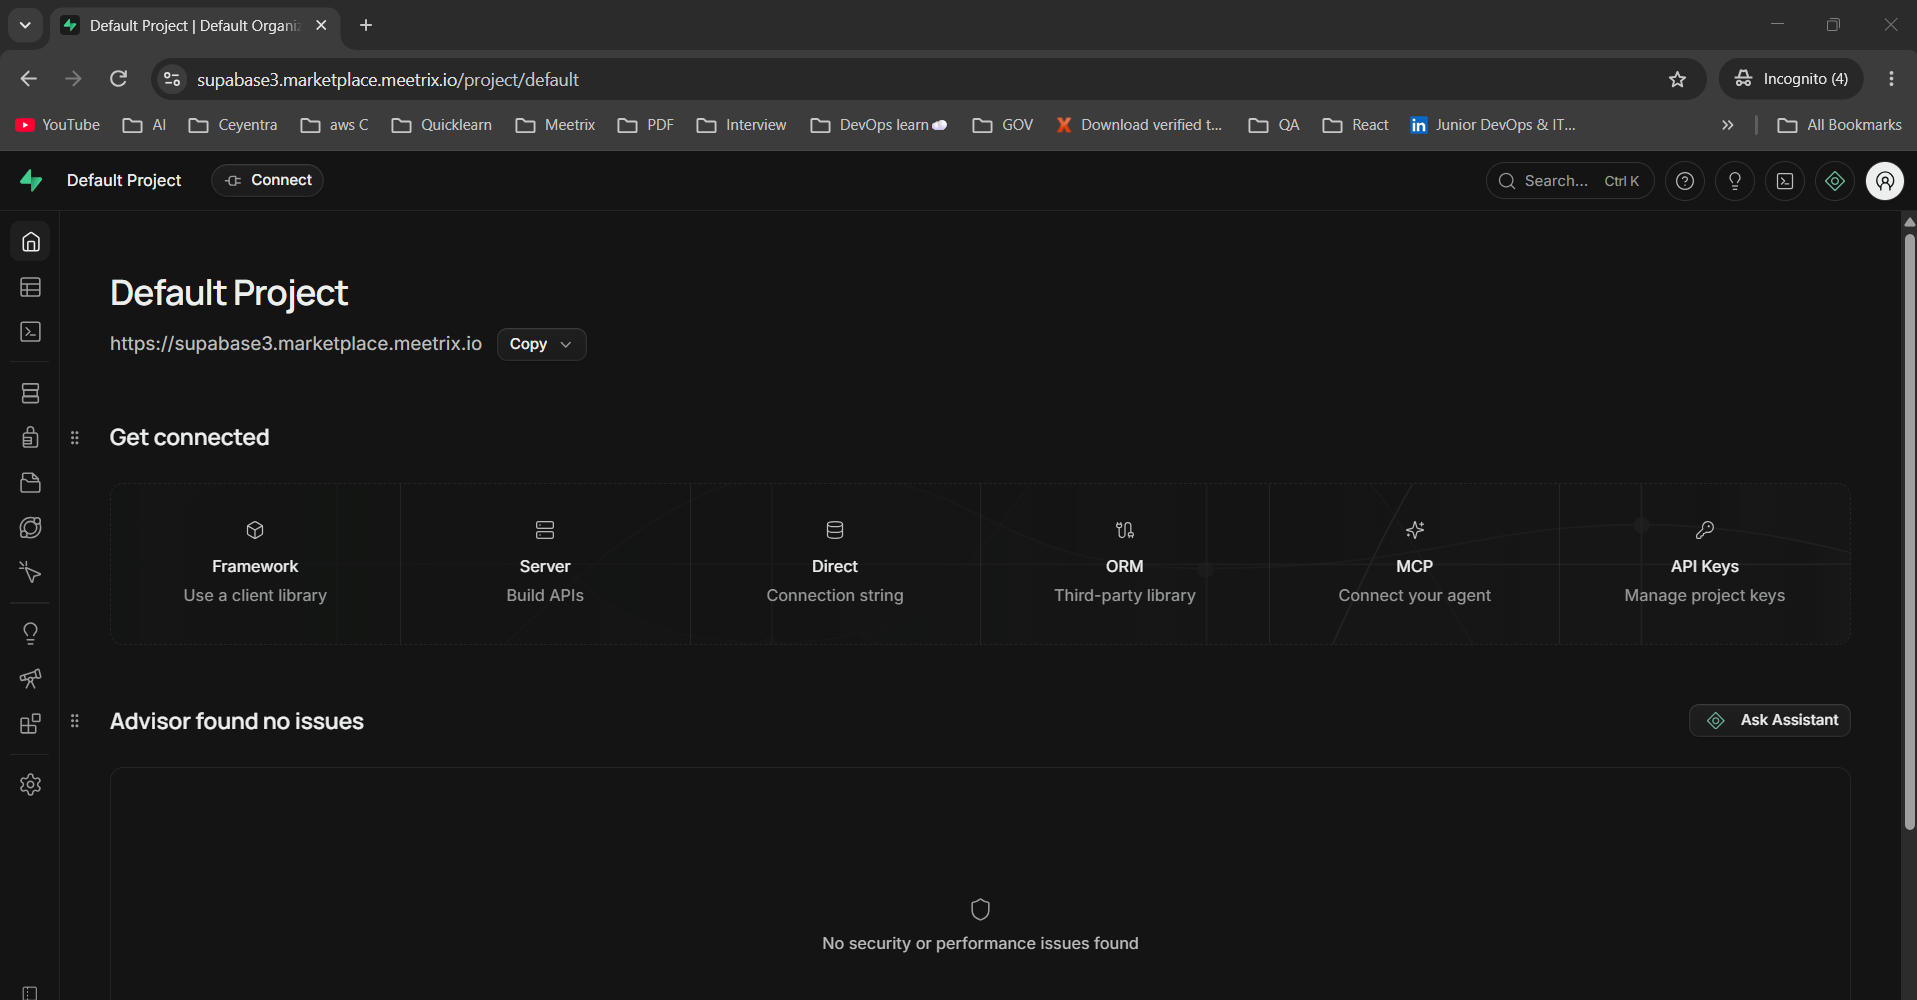
After signing in you land on the home page of the Default Project. It shows your project URL, a Get connected panel with connection details for client libraries, server code, a direct database connection, ORMs, MCP and API keys, and the advisor's security and performance checks. The Table Editor, SQL Editor, Authentication, Storage and Edge Functions are in the menu on the left.
Dashboard login
Get Your API Keys
Your app talks to Supabase through the API URL, which is the same address as your DashboardUrl. REST lives at /rest/v1/, Auth at /auth/v1/, Storage at /storage/v1/, Realtime at /realtime/v1/ and Edge Functions at /functions/v1/.
The keys are generated on first boot and stored in /opt/supabase/docker/.env. Log in to the server over SSH:
ssh -i <your key name> ubuntu@<Public IP address>Then print the keys:
sudo grep -E '^(ANON_KEY|SERVICE_ROLE_KEY|SUPABASE_PUBLISHABLE_KEY|SUPABASE_SECRET_KEY|POSTGRES_PASSWORD)=' /opt/supabase/docker/.env- SUPABASE_PUBLISHABLE_KEY or ANON_KEY: safe to use in client apps. What it can reach is decided by your Row Level Security policies.
- SUPABASE_SECRET_KEY or SERVICE_ROLE_KEY: server-side only. It bypasses Row Level Security, so never ship it in a browser or mobile app.
Edge Functions accept only the newer sb_publishable_... and sb_secret_... keys in the apikey header. The legacy ANON_KEY and SERVICE_ROLE_KEY JWTs still work for REST, Auth, Storage and Realtime.
Connect to Postgres
The security group opens only ports 22, 80 and 443. Postgres and the connection pooler (5432 and 6543) and the API gateway (8000) listen on localhost only, so they are never exposed to the internet. To reach the database from your machine with psql, a GUI client or a migration tool, open an SSH tunnel:
ssh -i <your key name> -L 5432:127.0.0.1:5432 ubuntu@<Public IP address>Leave that session open and connect from a second terminal. The user name is postgres, a dot, and the pooler tenant ID. Both the tenant ID and the password are in the same .env file, as POOLER_TENANT_ID and POSTGRES_PASSWORD:
psql "postgres://postgres.<POOLER_TENANT_ID>:<POSTGRES_PASSWORD>@127.0.0.1:5432/postgres"Configure Email (SMTP)
Auth sign-ups, magic links and password resets need a real SMTP server. Open the environment file:
sudo nano /opt/supabase/docker/.envSet SMTP_HOST, SMTP_PORT, SMTP_USER, SMTP_PASS, SMTP_ADMIN_EMAIL and SMTP_SENDER_NAME, save the file, then apply the change:
cd /opt/supabase/docker && sudo docker compose up -dUntil SMTP is configured, create users from Studio under Authentication and Add user, or set ENABLE_EMAIL_AUTOCONFIRM=true in the same file and run the same command, so sign-ups skip the confirmation email while you test.
Back Up the Database
If you set S3Bucket when creating the stack, backups are already running: every day at 12:00 UTC the instance dumps the whole database and uploads it to your bucket. With the default yours3bucket nothing is scheduled, and Turn On Backups After Launch below switches it on for an existing deployment.
| Setting | Value |
|---|---|
| Schedule | Daily at 12:00 UTC (the instance clock runs in UTC) |
| Cron job file | /etc/cron.d/supabase-dbbackup |
| Backup script | /opt/scripts/dbbackup.sh |
| Log file | /var/log/scripts/dbbackup.log |
| Destination | s3://<S3Bucket>/supabase-dbbackup/dump_<YYYY-MM-DD-HH-MM-SS>.sql.gz |
How the Backup Works
- On first boot, the stack writes your bucket name into
/opt/scripts/dbbackup.shand, only when S3Bucket is notyours3bucket, creates the cron job file. - Every day at 12:00 UTC, cron runs the script as root and appends its output to the log file.
- The script runs
pg_dumpallinside thesupabase-dbcontainer, which captures every database, role and Auth user. It gzips the dump, uploads it to S3 using the instance's IAM role, and deletes the local copy.
On that bucket, the instance role is allowed s3:PutObject and nothing else. It can upload backups, but it cannot list, download or delete them. Backups are never deleted automatically either, so add an S3 lifecycle rule to the bucket to expire old dumps, for example after 30 days.
Storage files are not in the dump
/opt/supabase/docker/volumes/storage. To protect them, take EBS snapshots of the volume, by hand or on a schedule with Amazon Data Lifecycle Manager.
Check, Run or Change the Backup
# Confirm the cron job is installed
cat /etc/cron.d/supabase-dbbackup

# See when cron last ran it
sudo journalctl -u cron | grep dbbackup | tail

# Check the result of the last runs
sudo tail /var/log/scripts/dbbackup.log

# Run a backup now
sudo /opt/scripts/dbbackup.sh
To change the time, edit the minute and hour fields (in UTC) in /etc/cron.d/supabase-dbbackup, for example 30 2 * * * for 02:30 UTC. Cron picks up the change on its own. To stop backups, delete the file:
sudo rm /etc/cron.d/supabase-dbbackupTurn On Backups After Launch
If you launched with the default yours3bucket, point the script at your bucket and create the cron job file, replacing <your-bucket> with the bucket name:
sudo sed -i 's;yours3bucket;<your-bucket>;g' /opt/scripts/dbbackup.sh
printf 'CRON_TZ=UTC\n0 12 * * * root /opt/scripts/dbbackup.sh >> /var/log/scripts/dbbackup.log 2>&1\n' | sudo tee /etc/cron.d/supabase-dbbackup
The instance role also needs permission to upload, and the stack granted it on yours3bucket only. In the IAM console, open the role named supabase-<DeploymentName>, edit its inline policy, and change the resource of the S3ForBackup statement to arn:aws:s3:::<your-bucket>/*. Make this change in IAM rather than through a stack update, which restarts the instance without re-running the first-boot setup. Then run sudo /opt/scripts/dbbackup.sh once and check that the dump appears in the bucket.
Restore a Backup
The instance role can only upload, so download the dump with your own AWS credentials and copy it to the server:
# On your machine
aws s3 cp s3://<your-bucket>/supabase-dbbackup/<dump-file>.sql.gz .
scp -i <your key name> <dump-file>.sql.gz ubuntu@<Public IP address>:/tmp/
Then, on the server, load it into Postgres and restart the stack so PostgREST reloads its schema cache:
gunzip -c /tmp/<dump-file>.sql.gz | sudo docker exec -i supabase-db psql -U supabase_admin -d postgres > /tmp/restore.log 2>&1
cd /opt/supabase/docker && sudo docker compose restart
rm /tmp/<dump-file>.sql.gz
The restore fills restore.log with "already exists" and "duplicate key" errors for Supabase's built-in schemas and roles. They are expected. Postgres loads each table's rows in one step, which decides what comes back:
- A table that is missing or empty comes back in full.
- A table that still holds any row with the same primary key as a row in the dump is left as it is, because one duplicate key cancels the load for that whole table. Rows deleted from it do not come back.
- A table without a primary key that still holds rows gets every dumped row added again, as duplicates.
So a restore onto the same server brings back dropped or emptied tables, not individual deleted rows. To get the whole database back as it was, restore onto a new stack.
Restore onto a Different Stack
The dump also carries the database role passwords of the server it was taken on. Loaded onto a different stack, such as a replacement server or a newer version, it sets those passwords back to the old server's, and the Supabase services on the new server can no longer log in to Postgres. After the restore, reset the passwords with Supabase's own script, then recreate the containers:
cd /opt/supabase/docker
sudo sh utils/db-passwd.sh
sudo docker compose up -d --force-recreate
The script shows a new random password and asks for confirmation, so type y. It updates every database role and the POSTGRES_PASSWORD in .env. If your project currently lives on supabase.com, our guide to migrating from Supabase Cloud to self-hosted covers bringing the database, Storage and Auth settings across.
Generate SSL Manually
SSL is issued automatically through a Route 53 DNS challenge when the domain's hosted zone is in the same AWS account. If your DNS is hosted elsewhere, or the stack finished without a certificate, follow these steps. Until then, use the DashboardUrlIp, which serves Studio over plain HTTP on the Elastic IP. The certificate script is set up for the DomainName you entered when creating the stack, so if you launched without a domain, the simplest route is a new stack with your domain set.
Step 1: Copy IP Address
- Follow the Update DNS steps above, if not already done, so the domain's A record points at the server.
- Copy the Public IP indicated as "PublicIp" in the "Outputs" tab.
Step 2: Log in to the server
- Open the terminal and go to the directory where your private key is located.
- Run the following command, replacing the key name and IP address.
- Type "yes" and press Enter to confirm.
ssh -i <your key name> ubuntu@<Public IP address>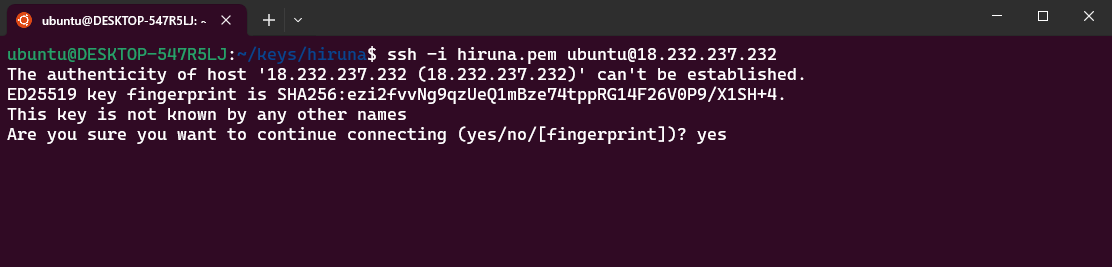
Step 3: Generate SSL
Run the following command and follow the prompts:
sudo bash /root/certificate_generate_standalone.shCheck Server Logs
Step 1: Log in to the server
ssh -i <your key name> ubuntu@<Public IP address>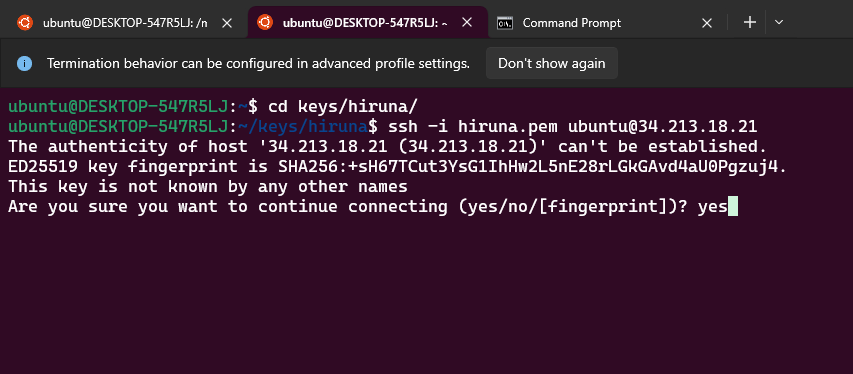
Step 2: Check the logs
Supabase runs as a set of Docker Compose services in /opt/supabase/docker. Check their status, follow the logs, or restart the whole stack:
cd /opt/supabase/docker
sudo docker compose ps          # status
sudo docker compose logs -f     # logs
sudo docker compose restart     # restart
To look at a single service, name it, for example sudo docker compose logs -f auth for Auth or sudo docker logs supabase-db for Postgres.
Shutting Down Supabase
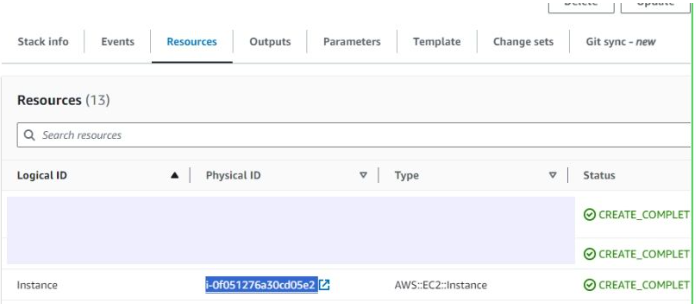
- In CloudFormation, click the link labeled "Instance" in the "Resources" tab to open the EC2 instance.
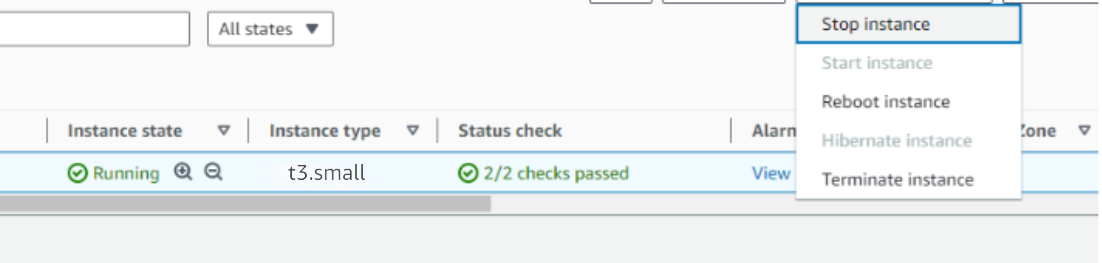
- Stop the Supabase instance from the Instance state dropdown. You can restart it later as needed.
Note
Remove Supabase
Take a final backup first with sudo /opt/scripts/dbbackup.sh. Then delete the CloudFormation stack from the AWS Management Console under "CloudFormation Stacks" by clicking "Delete". Deleting the stack removes the instance, its EBS volume with the database and Storage files, and the Elastic IP. The S3 bucket was not created by the stack, so the bucket and the backups in it are kept.
Upgrades
Meetrix publishes a new AMI for each Supabase release, and the AWS Marketplace listing shows the current version. To move to it:
- Run a backup on the old instance with
sudo /opt/scripts/dbbackup.sh. - Launch a new stack from the new version, with a different DeploymentName.
- Restore the dump on the new instance as shown in Restore a Backup, including the password reset in Restore onto a Different Stack, and copy
/opt/supabase/docker/volumes/storageacross. - Point your DNS record at the new PublicIp and check your app.
- Delete the old stack.
The new stack generates its own JWT secret and API keys, so update the keys your apps use. Signed-in users may need to sign in again.
Increase the Volume Size
When the database or Storage outgrows the volume, grow it in place. The data stays where it is and the instance keeps running.
- In CloudFormation, click the "Instance" link in the "Resources" tab, open the Storage tab, and click the volume ID.
- Choose Actions, then Modify volume, enter the new size in GiB, and click Modify. AWS's guide to modifying an EBS volume covers the options.
- When the volume state shows optimizing or completed, log in to the server and extend the partition and file system.
lsblk
sudo growpart /dev/nvme0n1 1
sudo resize2fs /dev/nvme0n1p1
df -h /
Check the disk name in the lsblk output first. Current instance types such as t3a show nvme0n1, while older Xen types such as t2 show xvda, with the partition as xvda1. Rebooting the instance also works: Ubuntu grows the root partition and file system to fill the volume at boot.
Do not change VolumeSize with a stack update
Troubleshoot
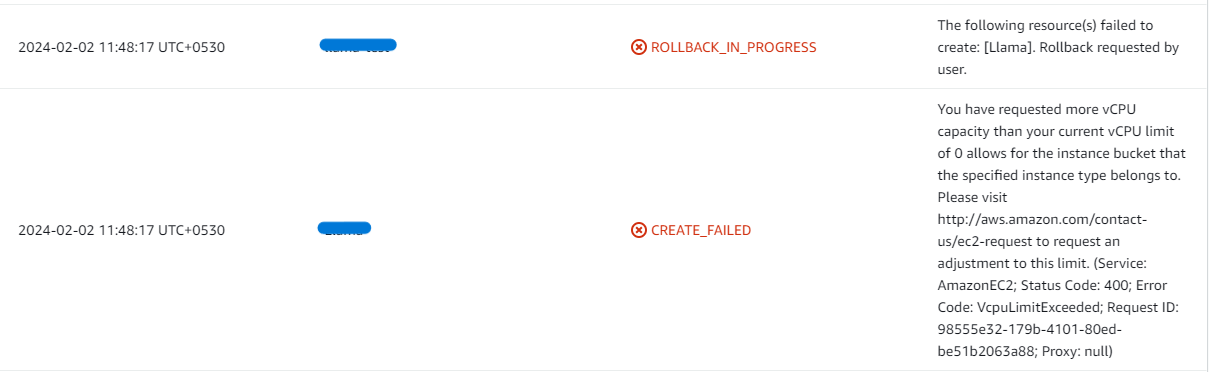
If you face vCPU quota limits, request an increase: How to increase AWS quota.
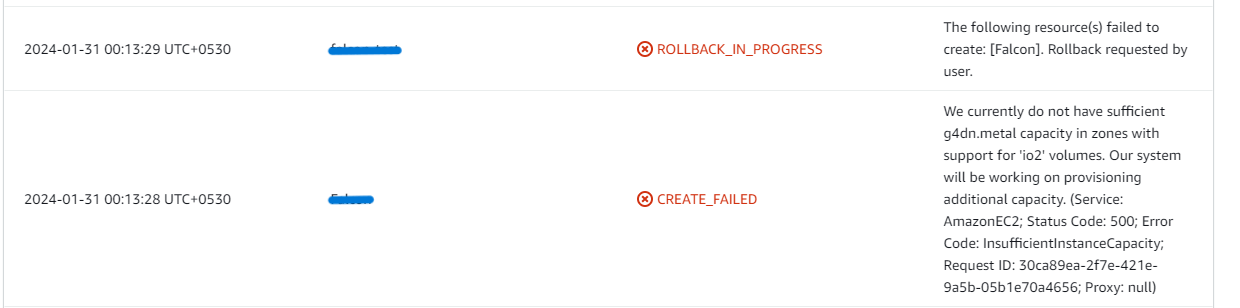
If you face insufficient capacity errors while creating the stack, try another region or time.
If the stack fails on the Instance resource, first boot either reported an error or did not finish within 20 minutes, and CloudFormation rolled the stack back. Check the reason in the Events tab and create the stack again. If it fails a second time, send the event message to support.
If Supabase shows a 502 Bad Gateway error after a reboot or a docker compose restart, wait a few minutes and retry. Nginx answers before the Supabase services behind it are back up.

If sign-up, magic link or password reset emails never arrive, SMTP is not configured yet. See Configure Email (SMTP) above.
Check whether the instance storage is full. Log into the server and run:
df -h
If the root volume is between 90-100%, increase the volume size.
Conclusion
The Meetrix Supabase Deployment Guide gets a self-hosted Supabase backend running in your own AWS account, with secrets generated per deployment, a volume sized for your data, and a daily database backup to S3. See the Supabase store page for what the Meetrix image includes on AWS and Google Cloud. If you are deploying on Google Cloud instead, follow the Supabase on GCP developer guide, and if you only need a plain database without the rest of Supabase, the PostgreSQL developer guide sets one up on AWS. The source code and release notes are on GitHub.
Technical Support
Reach out to Meetrix Support (aws@meetrix.io) for assistance with Supabase issues.
Frequently Asked Questions
What does the Meetrix Supabase AMI include?
A self-hosted Supabase stack on Ubuntu 26.04 LTS, running in Docker Compose: Postgres 17, Studio, Auth, PostgREST, Realtime, Storage, Edge Functions and the Supavisor connection pooler, behind an Nginx reverse proxy with a Let's Encrypt SSL certificate. The JWT secret, API keys and Postgres password are generated on first boot, so no two deployments share secrets.
Which instance type is recommended?
t3a.medium (2 vCPU, 4 GiB RAM), the default. Supabase needs at least 4 GiB of RAM, so do not pick anything smaller. Move to t3a.large or larger once real traffic, many Realtime connections or heavy queries arrive.
How big should the volume be, and can I change it later?
Set it with the VolumeSize parameter, anywhere from 20 to 16,384 GiB (30 GiB by default). The volume holds the Postgres database, files uploaded to Storage and the Docker images, so leave room to grow. You can enlarge it later from the EC2 console while the instance runs, but you cannot shrink it. Do not change VolumeSize through a stack update, because that replaces the instance.
How do I turn on daily database backups?
Enter the name of an existing S3 bucket in the S3Bucket parameter when you create the stack. The instance then dumps the database every day at 12:00 UTC and uploads the gzipped dump to the supabase-dbbackup/ folder of that bucket. With the default yours3bucket no backup is scheduled, but you can switch it on later from the server.
Does the backup include files uploaded to Supabase Storage?
No. The daily job dumps the database only: tables, roles and Auth users. Storage files live on the EBS volume under /opt/supabase/docker/volumes/storage, so take EBS snapshots to protect them.
How do I upgrade Supabase?
Meetrix publishes a new AMI for each Supabase release. Run a backup, launch a new stack from the latest version in AWS Marketplace, restore the dump on the new server and reset its database passwords, copy your Storage files across, then delete the old stack. The new stack generates its own API keys, so update them in your apps.
How do I get technical support?
Reach out to Meetrix Support at aws@meetrix.io for assistance with Supabase issues.
Ready to Deploy Your Own Supabase?
Get started in minutes with our pre-configured AMI and run Postgres, Auth, Storage and Realtime on infrastructure you own.
Deploy Supabase from AWS Marketplace