Welcome to the Meetrix LocalAI developer guide for Google Cloud Platform! LocalAI is an open-source runtime that runs language, embedding, image and audio models on your own hardware and serves them through an OpenAI-compatible API. Tools and SDKs written for the OpenAI API work against it by changing the base URL and API key, which is the idea behind running a self-hosted OpenAI-compatible API. The Meetrix GCP image runs LocalAI 4.12.1 in Docker on Ubuntu 26.04, behind an Nginx reverse proxy with automated SSL, protects both the web UI and the API with an API key, and comes with the qwen3-4b-instruct model ready to use.
This guide walks you through choosing a CPU or GPU machine type, launching the product from GCP Marketplace, pointing DNS, signing in, installing models, calling the API, and keeping the VM healthy. For what the image includes, see the LocalAI store page. If you run on AWS instead, the same image is covered in our LocalAI on AWS developer guide.
Prerequisites
Before you begin, make sure you have the following:
- Basic Google Cloud Platform knowledge, including Compute Engine.
- An active Google account with a GCP project and billing enabled.
- A domain name you can manage DNS records for.
- For a GPU deployment, NVIDIA L4 GPU quota in the region you will deploy to (new projects often start at zero).
Choose CPU or GPU
The same LocalAI image runs on CPU and on NVIDIA GPU machine types. Every time the VM boots, it checks for an NVIDIA GPU: if it finds one, it starts the CUDA build of LocalAI and offloads models to the GPU; if not, it starts the CPU build. You choose between them with the Machine type field on the deployment form.
| CPU | GPU | |
|---|---|---|
| Recommended machine type | e2-standard-4 | g2-standard-8 |
| Hardware | 4 vCPU, 16 GB RAM | 8 vCPU, 32 GB RAM, one NVIDIA L4 with 24 GB of GPU memory |
| Speed with qwen3-4b-instruct | About 6-7 tokens per second | About 65 tokens per second |
| Good for | Trying LocalAI, light use, testing, embeddings and batch jobs | Interactive chat, 7B to 14B models, image generation and speech |
| Quota | Standard vCPU quota | NVIDIA L4 GPU quota in the region |
The form also offers larger CPU types (e2-standard-8 and 16, e2-highmem-4, and n2-standard-4, 8 and 16) and the full g2 range from g2-standard-4 to g2-standard-32. Every g2 type carries one L4, so the larger ones add vCPUs and memory rather than GPU power. Start on a CPU type if you only want to evaluate LocalAI, and move to a GPU when response times matter. You can switch later without redeploying, as shown in Switch Between CPU and GPU below. Our breakdown of GPU costs for LLM inference on AWS and GCP helps you estimate what a GPU VM will cost each month.
Launch LocalAI from GCP Marketplace
Step 1: Find the Product
- Log in to your Google account.
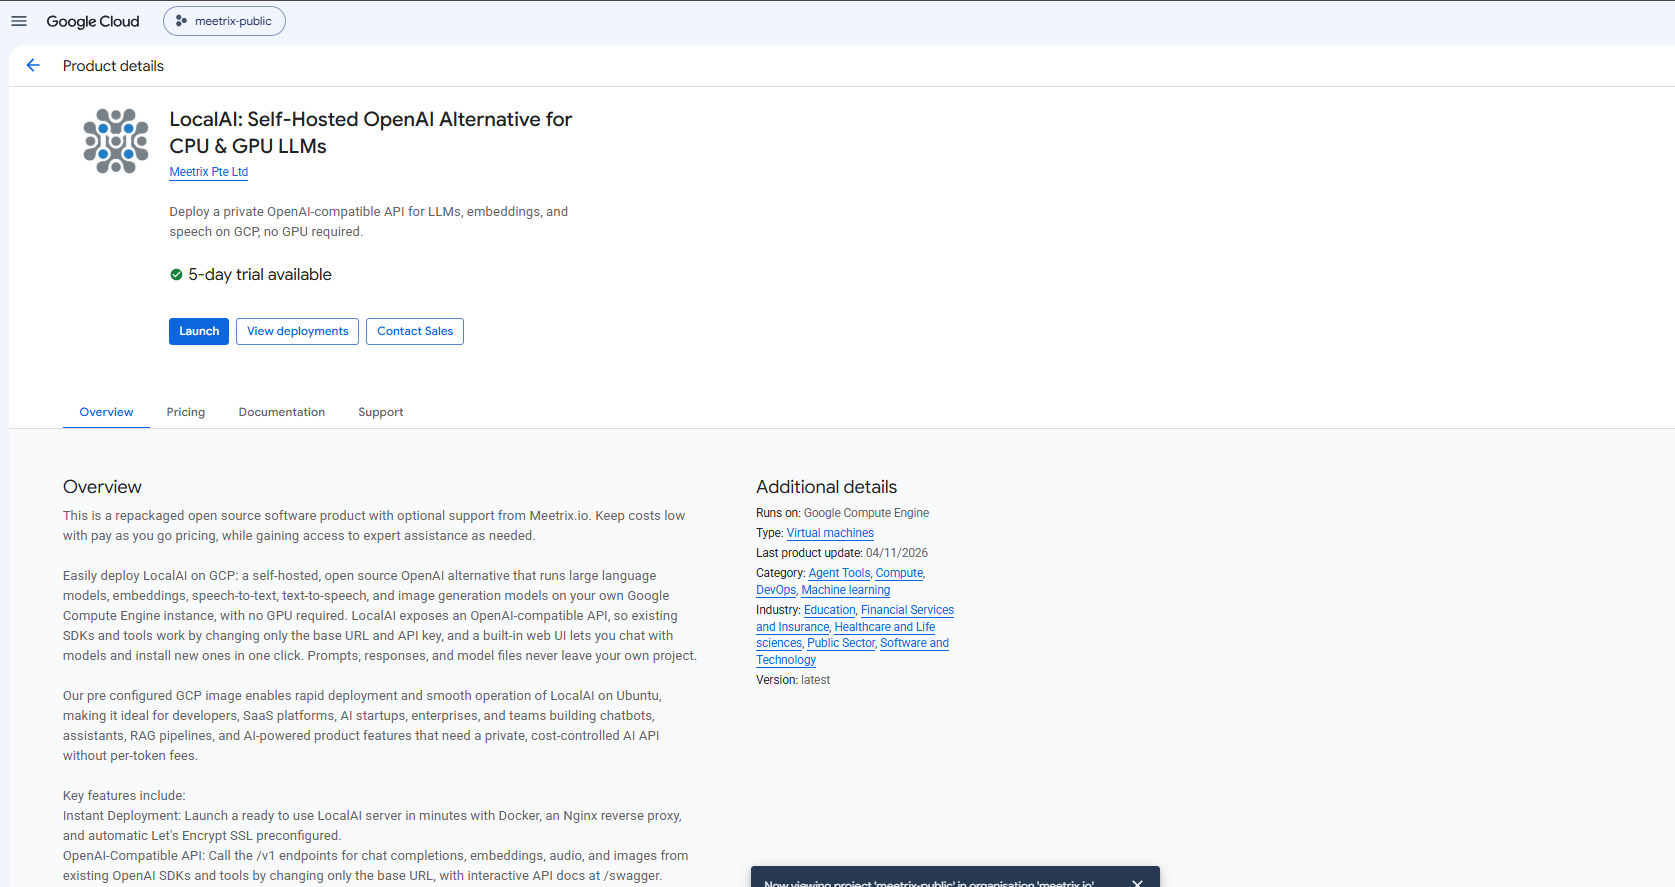
- Go directly to the product page: LocalAI: Self-Hosted OpenAI Alternative for CPU & GPU LLMs on GCP Marketplace
- You can also browse all Meetrix products at the Meetrix Solutions Page.
- You will see the following product listing page. Click Launch.
Step 2: Accept the Agreement
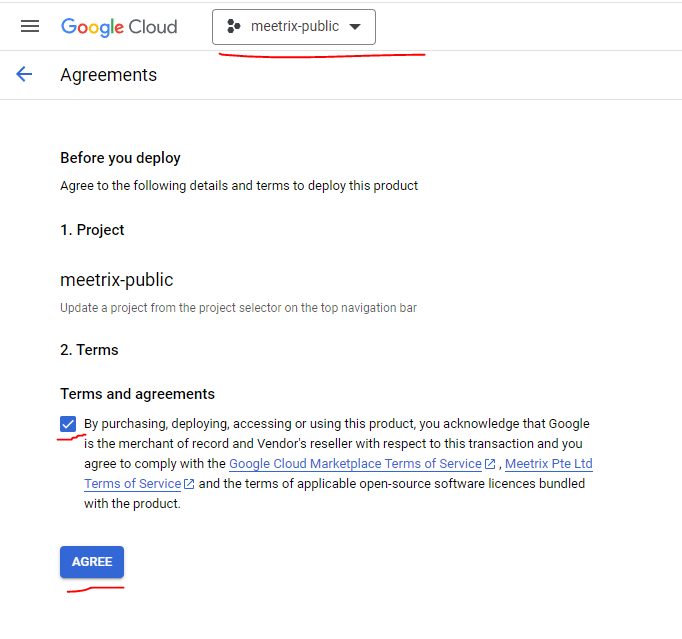
- Select your GCP project from the project selector at the top.
- Tick the terms and agreements checkbox.
- Click AGREE.
Free Trial
This product includes a 5-day free trial with up to USD 50.00 in licence fee credits. To activate it, tick I accept the solution trial Terms and Conditions at the bottom of the deployment form before you click Deploy.

Trial note
Configure Your LocalAI Deployment on GCP
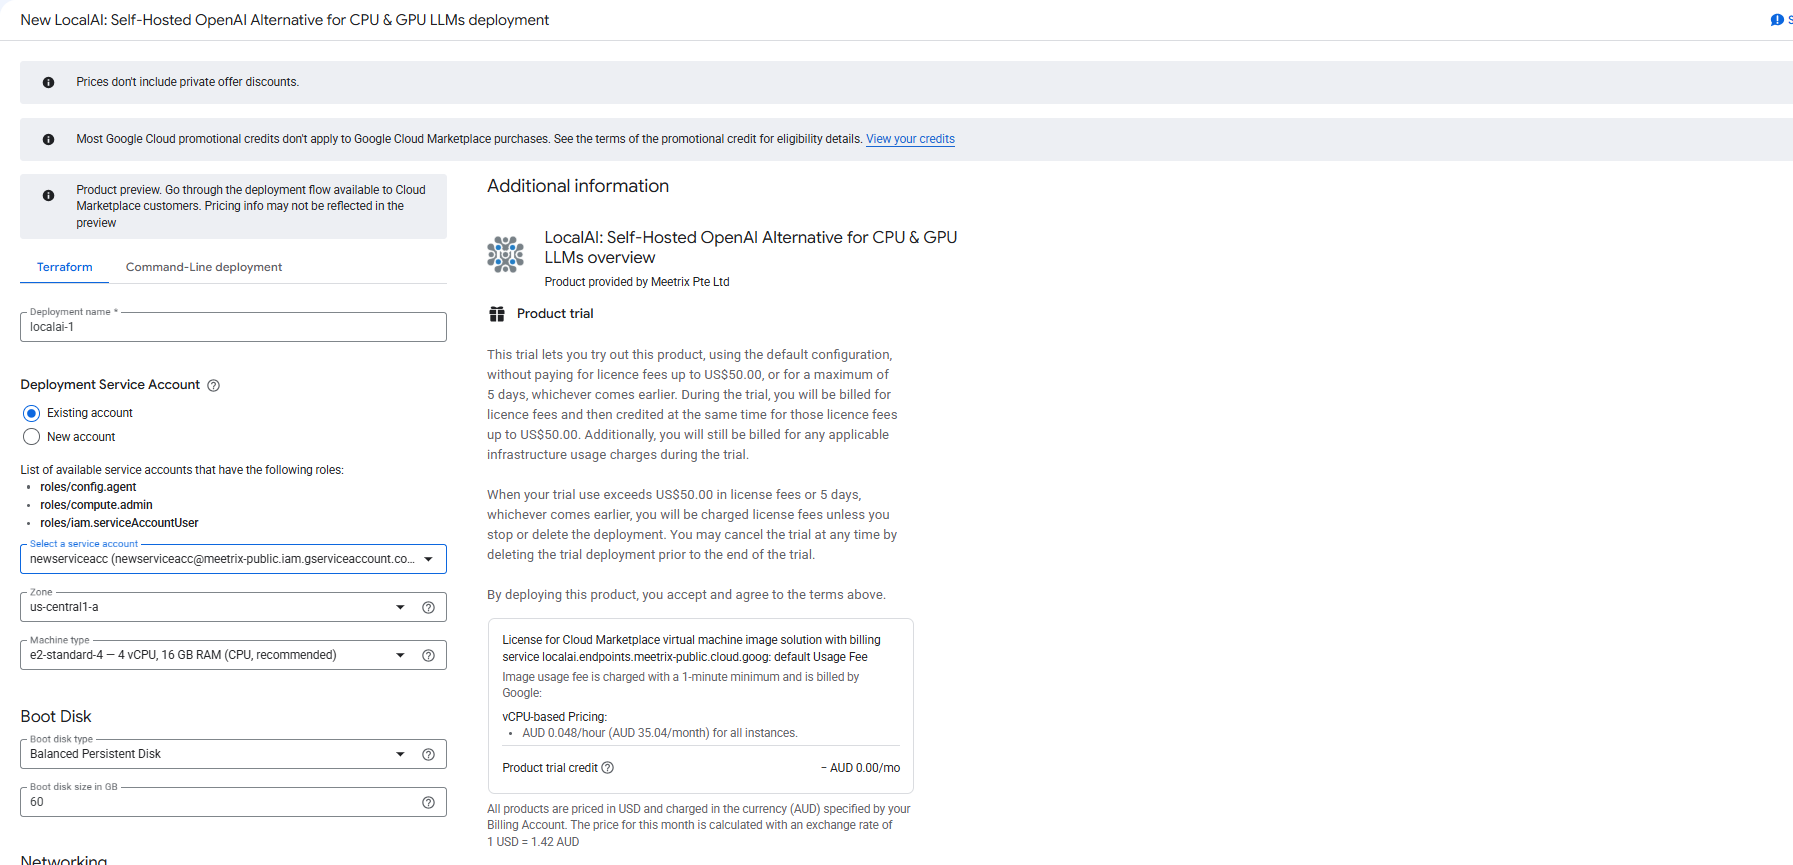
You will see the deployment configuration form. Fill in the fields across the following sections:
General
- Deployment name: A unique name for this deployment. The VM is named after it, with
-vmadded. - Deployment Service Account: Use an existing account that has the
roles/config.agent,roles/compute.adminandroles/iam.serviceAccountUserroles, or create a new one. - Zone: Select the GCP zone closest to your users. For a GPU machine type, pick a zone that offers NVIDIA L4 GPUs, such as
us-central1-aorus-central1-b. - Machine type:
e2-standard-4for CPU org2-standard-8for GPU, as described in Choose CPU or GPU above. CPU types need at least 16 GB of RAM.
GCP shows an estimated monthly cost, made up of the Meetrix licence fee and the infrastructure fee for your machine type and disk, before you deploy.
Boot Disk
- Boot disk type: The default
Balanced Persistent Diskis recommended. - Boot disk size: The default and minimum is 60 GB, which holds the pre-installed model with room for a few more. Each model takes several gigabytes, so choose a larger disk if you plan to install many.
Networking
- Network / Subnetwork: Leave as
defaultunless you have a custom VPC. - External IP: Leave as
Ephemeral, or choose a reserved static IP if you want the address, and your DNS record, to survive a stop and start of the VM. - Allow SSH (TCP port 22) from the Internet: Enabled by default. Restrict the Source IP ranges for SSH traffic field to your own IP range if you want to limit SSH access.
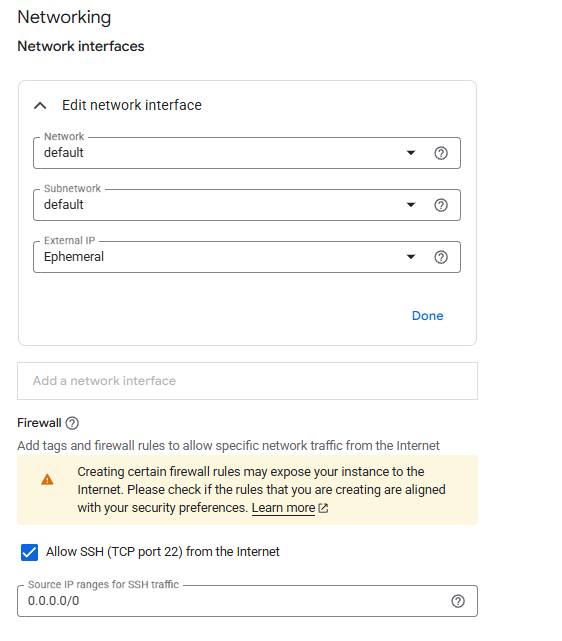
The deployment also opens ports 80 and 443 to the VM for the web UI and the API. Leave Allow full access to all of Google Cloud Platform APIs on the VM unticked; LocalAI does not need it.
Application Settings
- Domain name: The domain for your LocalAI server (e.g.
localai.yourdomain.com). Point your DNS A record to the VM's external IP after deploying. - Admin email: Used for SSL certificate registration via Let's Encrypt.
- API key: Choose your own key. It works like a password: you sign in to the web UI with it, and every API request sends it as a bearer token. It must be 16 to 128 characters long and can contain only letters, numbers, dashes and underscores. Use a long random value and store it securely.
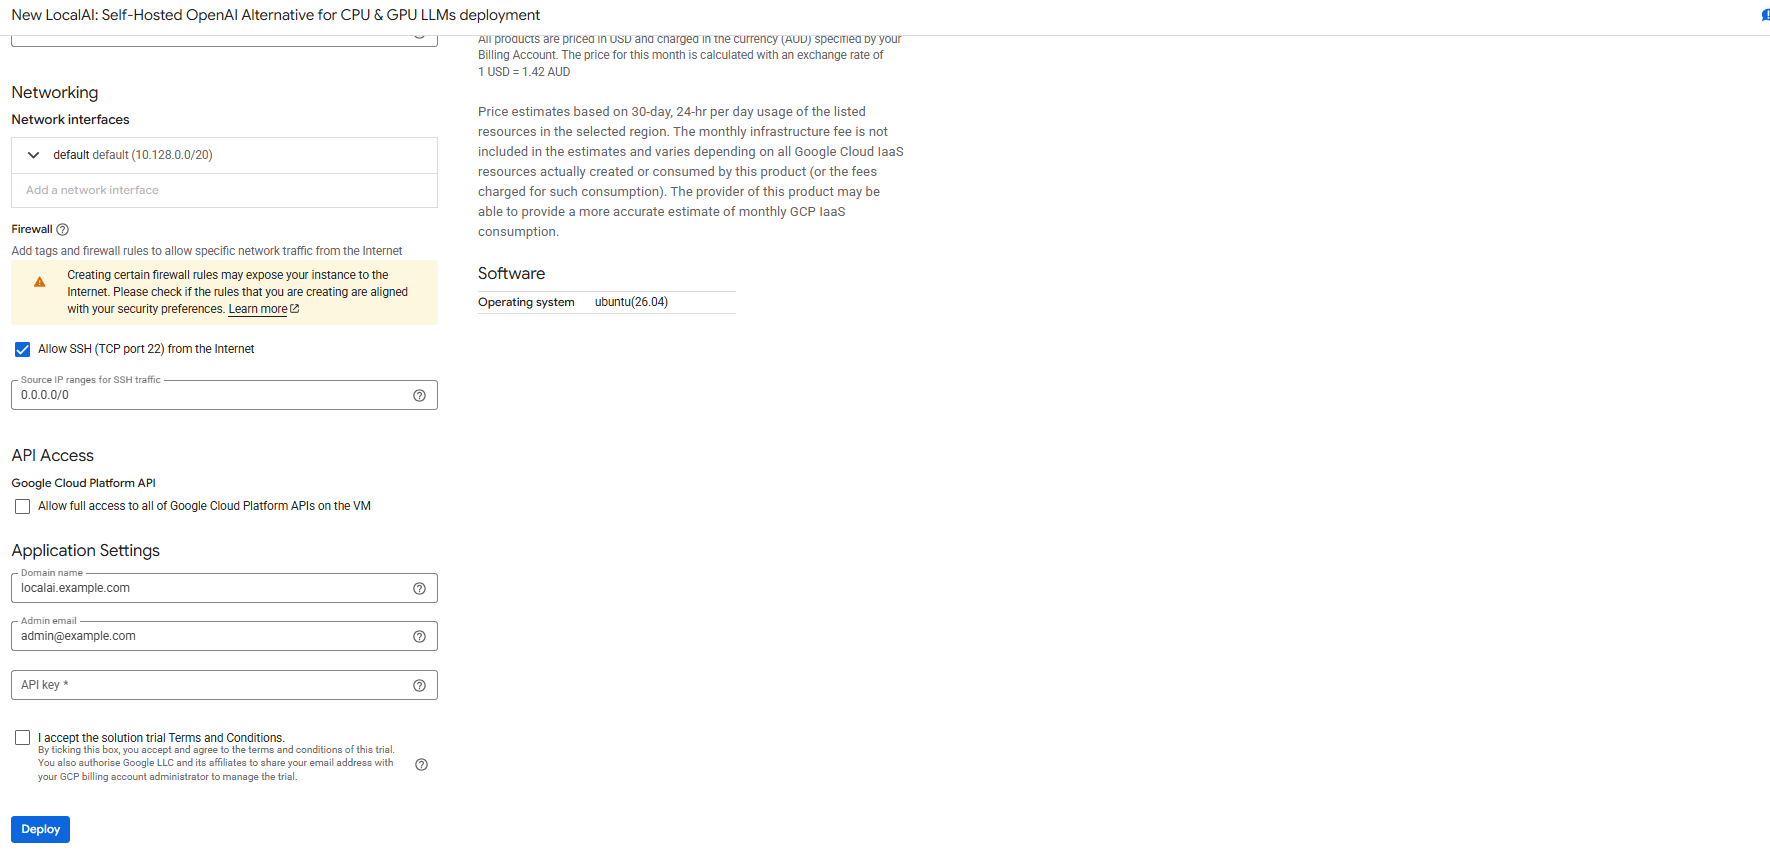
Tick the trial checkbox if you want the free trial, click Deploy, and wait a few minutes for the deployment to complete. Allow about 2 more minutes after that for the first boot, while the VM starts LocalAI and loads the model into memory so your first request answers right away.
Point DNS to Your LocalAI Server
Step 1: Get the External IP
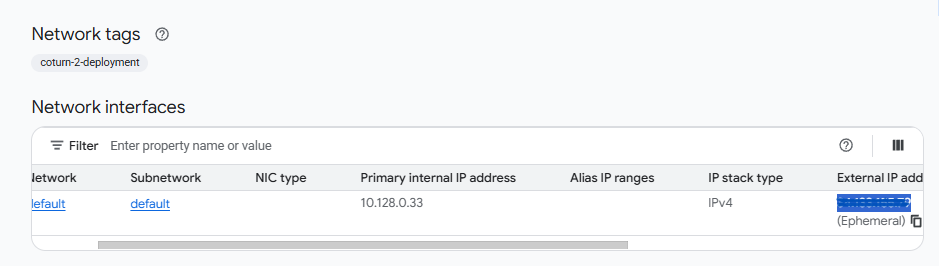
- Once deployment is complete, click the VM instance resource name in the deployment details.
- Copy the External IP from the Network interfaces section.
Step 2: Create a DNS A Record
- Go to your DNS provider.
- Add an A record pointing your LocalAI domain (e.g.
localai.yourdomain.com) to the copied external IP. - Wait for DNS propagation before proceeding (typically a few minutes to 1 hour).
DNS must propagate first
Access LocalAI
The deployment outputs list four addresses: site_url (the web UI on the VM's IP over plain HTTP, which works straight away), dashboard_url (the web UI on your domain over HTTPS), api_base_url (your domain followed by /v1) and swagger_ui_url (the interactive API documentation). Once DNS has propagated and SSL has been issued, open your domain.
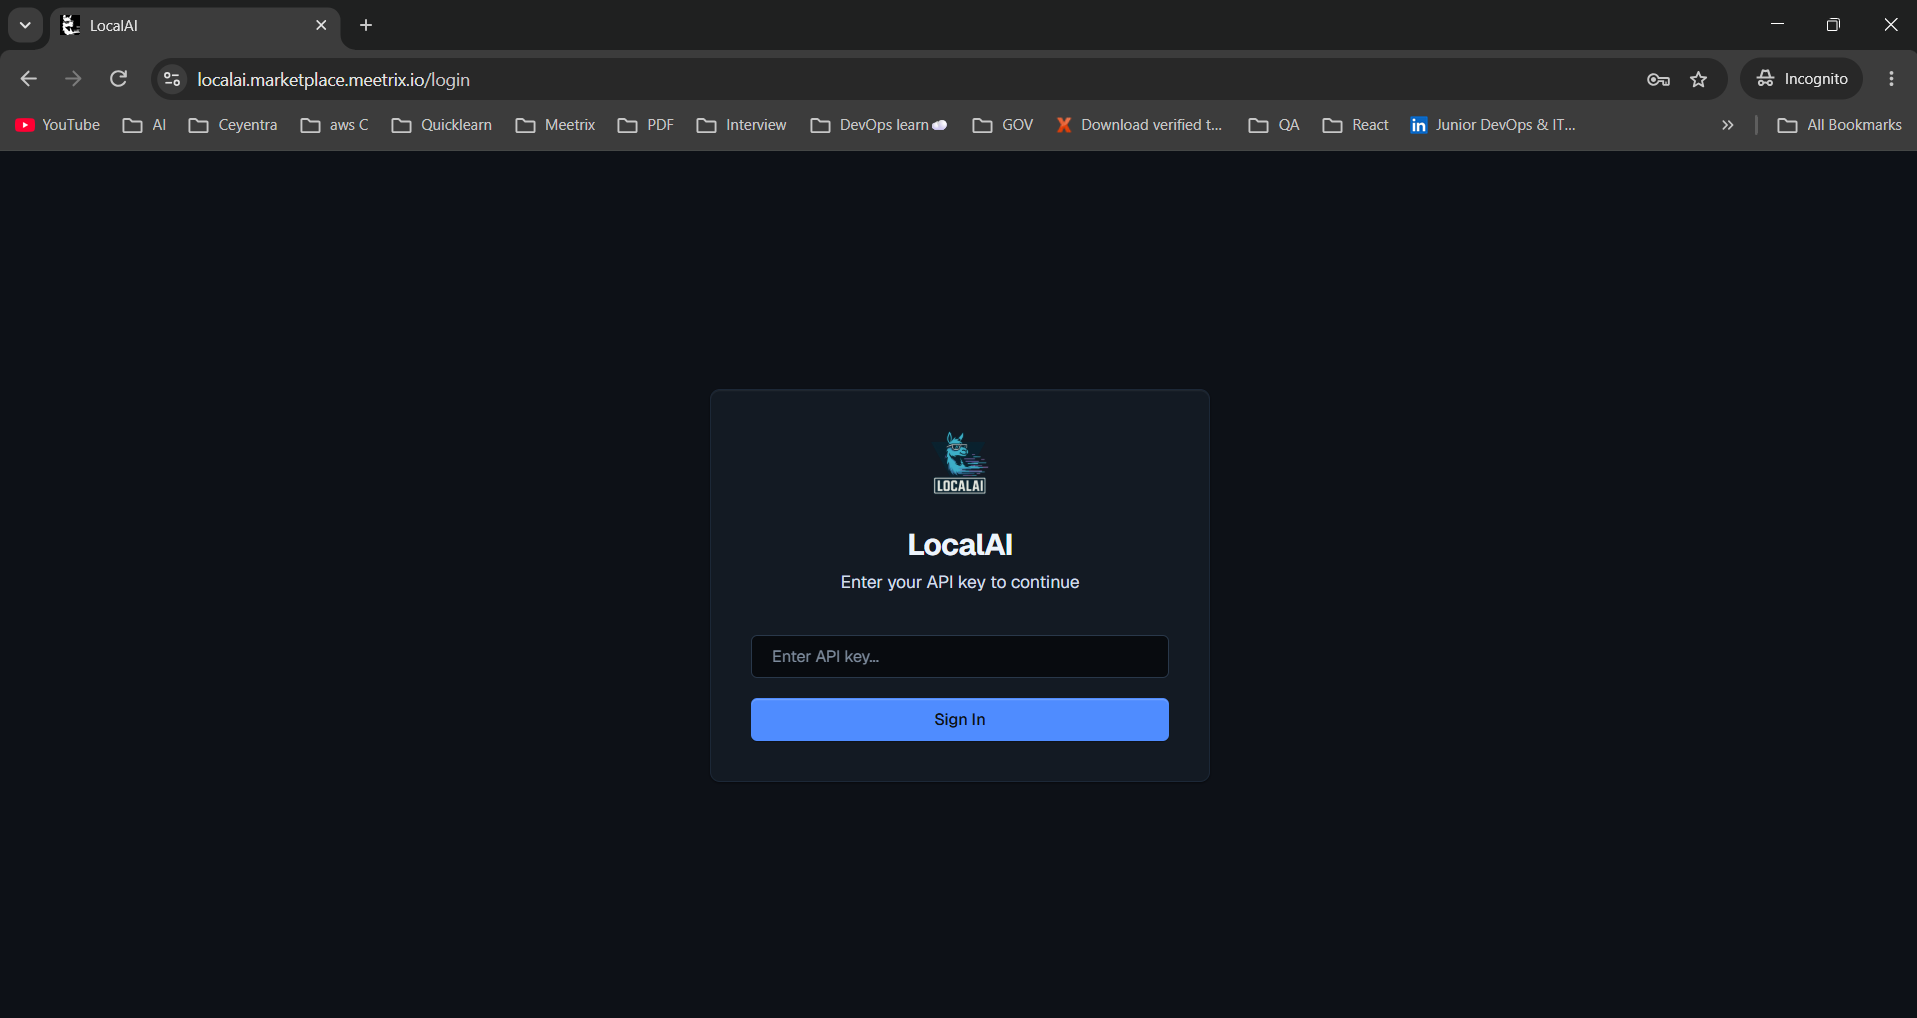
On the sign-in page, enter the API key you set in the Application Settings and click Sign In.
502 Bad Gateway Error?
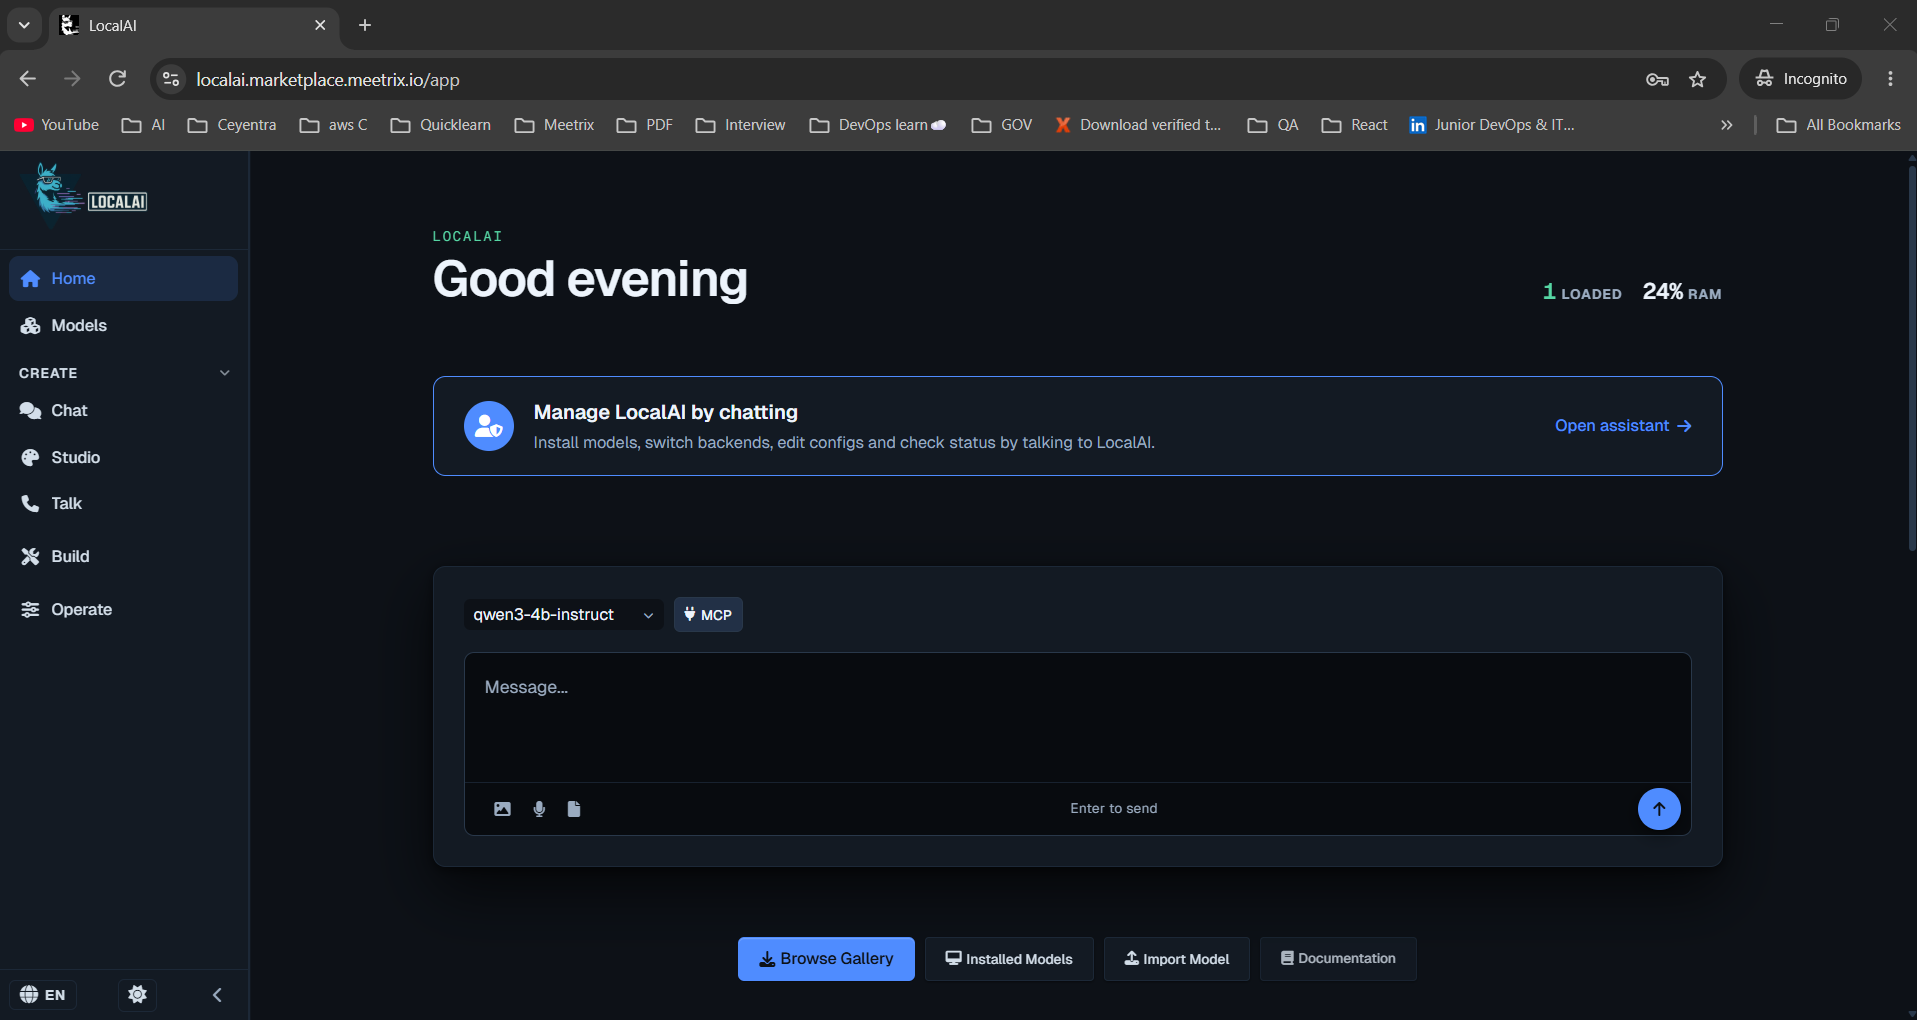
After signing in you land on the LocalAI home page. The pre-installed qwen3-4b-instruct model is already selected in the chat box, so you can type a message and get a reply straight away. The counters in the top-right corner show how many models are loaded and how much of the VM's RAM they use. The menu on the left opens Models, the Chat, Studio and Talk tools, Build for importing your own models, and Operate for activity and system status.
API key
Install More Models
LocalAI installs models from its gallery of more than 1,900 entries, which covers chat models, embedding models, image generators, and speech models.
- Click Browse Gallery on the home page, or open Models in the menu.
- Search for a model by name or filter by type, then click Install.
- Follow the download progress at the top of the page, or under Operate. Once it finishes, the model appears in the model dropdown in Chat.
You can also install a model through the API, using its gallery ID:
curl https://<your-domain>/models/apply \
  -H "Authorization: Bearer <your API key>" \
  -H "Content-Type: application/json" \
  -d '{"id": "localai@qwen3-1.7b"}'
Pick models that fit your machine type. On a CPU type, choose one with at least twice the model file size in RAM, and expect 7B and larger models to be slow. On a g2 type, the L4's 24 GB of GPU memory fits quantized 7B to 14B chat models. qwen3-4b-instruct answers directly without a "thinking" phase, which keeps it fast on CPU; reasoning models such as qwen3-4b think step by step first and can take minutes per reply on CPU. If you are not sure which open model to start with, our roundup of the best open-source LLMs to self-host compares the main families, and the LocalAI models documentation covers importing models straight from Hugging Face.
Call the LocalAI API
Use the api_base_url from the deployment outputs, which is your domain followed by /v1, and send your API key in the Authorization header. Replace the domain and key with your own and list the installed models:
curl https://<your-domain>/v1/models \
  -H "Authorization: Bearer <your API key>"
Then send a chat completion request to the pre-installed model:
curl https://<your-domain>/v1/chat/completions \
  -H "Content-Type: application/json" \
  -H "Authorization: Bearer <your API key>" \
  -d '{
    "model": "qwen3-4b-instruct",
    "messages": [{"role": "user", "content": "Say hello in one sentence."}]
  }'
Because the API is OpenAI-compatible, the official OpenAI SDKs work by changing the base URL. In Python:
from openai import OpenAI

client = OpenAI(
    base_url="https://<your-domain>/v1",
    api_key="<your API key>",
)

response = client.chat.completions.create(
    model="qwen3-4b-instruct",
    messages=[{"role": "user", "content": "Say hello in one sentence."}],
)
print(response.choices[0].message.content)
The full list of routes, including embeddings, audio and image generation, is in the Swagger UI at https://<your-domain>/swagger/index.html. Tools built for the OpenAI API work the same way: you can point a self-hosted Hermes Agent at this endpoint, or use LocalAI for both embeddings and answers in a retrieval pipeline built on a self-hosted Milvus vector database.
Generate an SSL Certificate Manually
LocalAI tries to issue SSL on first boot for the domain name you provided during deployment. If that fails, for example because DNS had not propagated yet, generate it manually.
Step 1: SSH into the Server
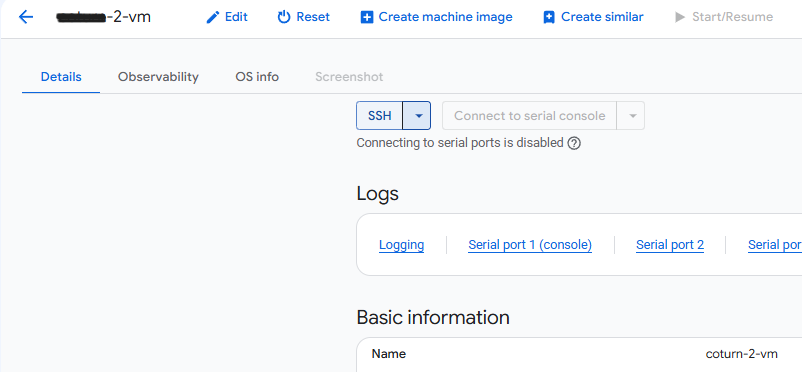
- Go to the VM instance page in the GCP console.
- Click SSH to open a browser-based terminal and authorize access.
If you prefer your own terminal, you can connect with the gcloud CLI instead, replacing the deployment name and zone:
gcloud compute ssh <deployment-name>-vm --zone=<zone>Step 2: Run the Certificate Script
The image includes a pre-configured certificate script. Run it with:
sudo bash /root/certificate_generate_standalone.shThis script runs certbot using the domain name and admin email you provided during deployment. Once it completes, switch any applications that call the API over http to the https api_base_url, so the API key is no longer sent in plain text.
Check LocalAI Server Logs
SSH into the server as shown above. LocalAI runs in a Docker container named localai. Its logs show model downloads, backend selection and any errors when a model fails to load:
sudo docker ps

sudo docker logs -f localai
A systemd service, localai, picks the CPU or GPU build at every boot and starts the container. Check its status and see which build it chose with:
sudo systemctl status localai

sudo journalctl -u localai
On a g2 machine type, confirm that the L4 is visible and, while a model is answering a request, that its memory is in use:
nvidia-smiThe stack lives in /opt/localai: .env holds the version and the API key, models/ holds model files and their configs, and backends/ holds the installed inference backends.
Manage Your LocalAI Deployment on GCP
Switch Between CPU and GPU
You can move an existing deployment between CPU and GPU without redeploying:
- Go to Compute Engine → VM Instances, select your LocalAI VM, and click Stop.
- Click Edit and change the machine type.
- When switching to a g2 type, also set On host maintenance to Terminate VM instance, since GPU VMs cannot live-migrate.
- Save and click Start/Resume.
LocalAI detects the new hardware on boot and starts the matching build. Your installed models and settings stay on the disk. If the VM will not start on a g2 type, check your L4 quota (see GPU Quota Errors below) and that the VM's zone offers L4 GPUs. Not every zone does, and a zone without them needs a new deployment in one that has them.
Change the API Key
Edit LOCALAI_API_KEY in /opt/localai/.env, then restart LocalAI:
sudo nano /opt/localai/.env

sudo systemctl restart localai
Update every application that calls the API with the new key.
Shut Down the VM
To stop the VM without deleting it, go to Compute Engine → VM Instances in the GCP console, select your instance, and click Stop. You can restart it later by clicking Start/Resume.
Note
Delete the Deployment
To fully remove the deployment and stop all billing:
- Go to Solution deployments in the GCP console.
- Find your LocalAI deployment.
- Click Delete to remove the VM, its disk, and the firewall rules the deployment created.
Upgrades
When there is an upgrade, we update the product with a newer version. You can check the product version in GCP Marketplace. If a newer version is available, back up any models and configuration you need, delete the current deployment, and launch the product again using the newer version.
To update LocalAI in place on an existing VM instead, set LOCALAI_VERSION in /opt/localai/.env to the new release, then pull the new images and restart. Installed models and backends are kept. Check the LocalAI release notes before you upgrade.
cd /opt/localai && sudo docker compose pull && sudo systemctl restart localaiTroubleshoot LocalAI on GCP
GPU Quota Errors
GCP enforces GPU quotas, and new projects often have a limit of zero. If a g2 deployment fails with a quota error, request an increase for NVIDIA L4 GPUs in your region, and for GPUs (all regions) if it is also zero, under IAM & Admin → Quotas. Google's resource quotas documentation explains the request flow.
No L4 Capacity in the Zone
If a GPU deployment fails with ZONE_RESOURCE_POOL_EXHAUSTED or STOCKOUT, the zone has no free L4 GPUs at the moment. Deploy to another zone, such as us-central1-b, or try again later.
502 Bad Gateway
If you see a 502 Bad Gateway error when accessing your domain, LocalAI is still starting up. Wait 5-10 minutes and try again. If it persists, check the container status and logs as shown above.
401 Unauthorized
If API calls return 401 Unauthorized, check that the request sends Authorization: Bearer followed by the exact API key from the deployment form, or the new one if you changed it in /opt/localai/.env.
Slow Responses or a Model Fails to Load
The first request after a reboot takes 15 to 25 seconds while the model loads. If every reply is slow or a model fails to load, the model is probably too large for the VM. Check the container logs, try a smaller or more heavily quantized model, or move to a g2 machine type. On a g2 VM, if nvidia-smi shows no memory in use while a model answers, check sudo journalctl -u localai to confirm the GPU build was started.
SSL Did Not Issue
Confirm your DNS A record points at the VM's current external IP and has propagated, then re-run the certificate script from Generate an SSL Certificate Manually.
Storage Full Error
Models take several gigabytes each, so the boot disk fills up as you install more. SSH into the server and run:
df -hIf the root volume is between 90-100%, delete models you no longer use from the Models page or resize the boot disk from the Compute Engine console, then reboot the instance.
Conclusion
You now have LocalAI running in your own GCP project, on CPU or an NVIDIA L4, with SSL, your own domain, and an OpenAI-compatible API that keeps your prompts and data inside your project. From here, install the models you need, point your applications at the API, and stop the VM when nobody is using it. If you need maximum throughput from a single GPU model rather than LocalAI's range of model types, our vLLM on GCP developer guide deploys a dedicated inference server, and the Ollama vs vLLM comparison explains where each kind of engine fits.
Technical Support
If you run into any issues, our support team is here to help. Reach out to us at support@meetrix.io and we will respond within 12 hours.
Frequently Asked Questions
What is LocalAI?
LocalAI is an open-source, MIT-licensed runtime for running AI models on your own hardware. It exposes an OpenAI-compatible API for text generation, embeddings, image generation, speech-to-text and text-to-speech, and ships a web UI for chatting with models and installing new ones from its gallery.
How do I log in to LocalAI on GCP?
Open your domain, or the external IP of the VM before SSL is in place, and enter the API key you set in the Application Settings section of the deployment form. The same key is the bearer token for API requests, so store it securely and treat it like a password.
Does LocalAI on GCP need a GPU?
No. The Meetrix image runs on both CPU and GPU machine types and detects the hardware at every boot. e2-standard-4 (4 vCPU, 16 GB RAM) is the recommended CPU machine type and produces about 6-7 tokens per second with the pre-installed model. The g2 machine types carry one NVIDIA L4 with 24 GB of GPU memory and reach about 65 tokens per second, and they need NVIDIA L4 GPU quota in your region.
Which model is installed by default?
qwen3-4b-instruct (Qwen3-4B-Instruct-2507, Apache-2.0) comes pre-installed with the llama.cpp CPU and CUDA backends, so you can chat with it as soon as you log in. Install more models from the gallery under Models in the web UI.
Can I switch an existing LocalAI VM from CPU to GPU?
Yes. Stop the VM, change its machine type in the Compute Engine console to a g2 type, set On host maintenance to Terminate VM instance, and start it again. LocalAI picks the GPU image on the next boot, and nothing needs to change on the VM itself.
How do I change the LocalAI API key?
SSH into the VM, edit LOCALAI_API_KEY in /opt/localai/.env, and run sudo systemctl restart localai. Then update every application that calls the API with the new key.
How do I get technical support?
Reach out to Meetrix Support at support@meetrix.io for help with the LocalAI GCP deployment.
Deploy LocalAI on GCP in Minutes
Launch a pre-configured LocalAI server in your own Google Cloud project with a Meetrix image, and run an OpenAI-compatible AI API on CPU or NVIDIA L4 GPU machine types you control.
Get Started on GCP Marketplace